
How to learn the handstand: from the wall headstand to standing free
The free handstand looks like magic – but it's a matter of systematic progression. From the wall headstand via the frogstand to standing freely: the complete path from the Strive Up skill tree.
Contents
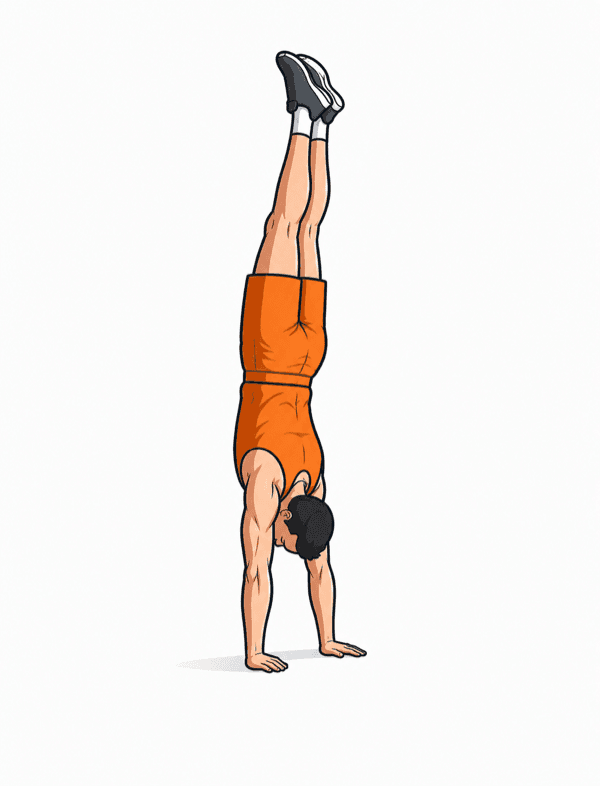
The free handstand looks like magic – but it comes down to shoulder strength, balance and patience. Approach it systematically and 30 seconds is realistic within 6–12 months.
This guide shows you the exact path from the Strive Up skill tree: from the wall headstand via the frogstand to standing freely on your hands.
What makes the handstand hard
Three components have to come together:
- Shoulder strength & endurance: at least 30 seconds of load in a maximally overhead position.
- Balance: micro-corrections through the fingers – a skill in its own right.
- Full-body tension: the hollow body position (abs tight, ribs down, glutes squeezed).
Muscles involved
Front delts, triceps, trapezius, core, wrists. That last one is often underestimated – take wrist mobility seriously or it will be your limiting factor.
Prerequisites
Before you work on the handstand you should have this base:
- Push-ups: 25 clean reps – pressing strength as the base
- Pike push-ups (feet elevated): 12 reps – vertical pressing
- Headstand 0:30: inversion tolerance and neck stability
Your path to the handstand
Your path to the free handstand
Two parallel routes: the classic wall path via the headstand, and the frogstand path via balance.
The stages explained
1. Headstand (wall, parallettes)
Headstand against the wall using parallettes or a yoga block. You get used to being inverted without loading your neck too much.
2. Headstand (wall → free)
From the wall headstand to a free one. Here you learn the tripod that will also stabilise you in the handstand: thumbs and index fingers form a triangle, three points carry you.
3. Handstand (wall)
With your belly to the wall (not your back!) – that's how you train the correct hollow body position. Target: 30 seconds with your fingers 5–10 cm from the wall.
4. Frogstand
Knees resting on the elbows – you lift into a balanced position on your hands. This trains the finger corrections you'll need in the handstand later.
5. Frogstand (knees off)
The knees now float freely in front of the elbows. Pure balance work – the final link before the free handstand.
6. Handstand (0:30)
Once the wall handstand, free headstand and frogstand are all solid, the free handstand follows. Practise with 5–10 attempts per session, short holds, working away from the wall.
Common mistakes
The banana shape
Arched lower back and ribs flaring forward – it looks like a banana. Actively pull the abs in, ribs down, glutes squeezed. The belly-to-wall handstand forces you into it.
Passive shoulders
The shoulders have to be actively pushed up (protraction). Sinking shoulders lead to a banana and a loss of balance.
Forgetting wrist mobility
Wrist pain in the handstand means you skipped the mobility work. Two to three minutes of wrist mobility before every handstand session is mandatory.
Training plan
You learn the handstand through high frequency with low load per session. Ten minutes five times a week beats sixty minutes once a week.
Daily mini session (10 min)
2 min wrist mobility · 3 sets of wall handstand (belly to the wall, 30 seconds each) · 3 sets of frogstand (30 seconds each) · 5–10 free attempts (short, no frustration)
Next step: the handstand push-up
Once you can stand free for 30 seconds the next skill opens up: the freestanding handstand push-up. Until then: practise consistently and stay patient. Nobody builds a handstand in four weeks.
Train smarter with Strive Up
Track your training, use the EMOM timer, follow your PRs and discover your personal skill roadmap – for free.


Related articles
How to learn the muscle up: the complete progression guide
From the dead hang to your first clean muscle up: prerequisites, every lead-up stage, common mistakes and a clear plan that actually gets you to the king of bar skills.
How to do pull-ups properly: technique, mistakes & progression
From the dead hang via scapula and band pull-ups to a clean full-range rep: technique, common mistakes and the complete progression ladder from the Strive Up skill tree.
How to do dips properly: from the bench dip to muscle-up ready
The complete dip progression: bench, parallel bars, straight bar, russian. Technique, common mistakes and a training plan – straight from the Strive Up skill tree.